In a nutshell
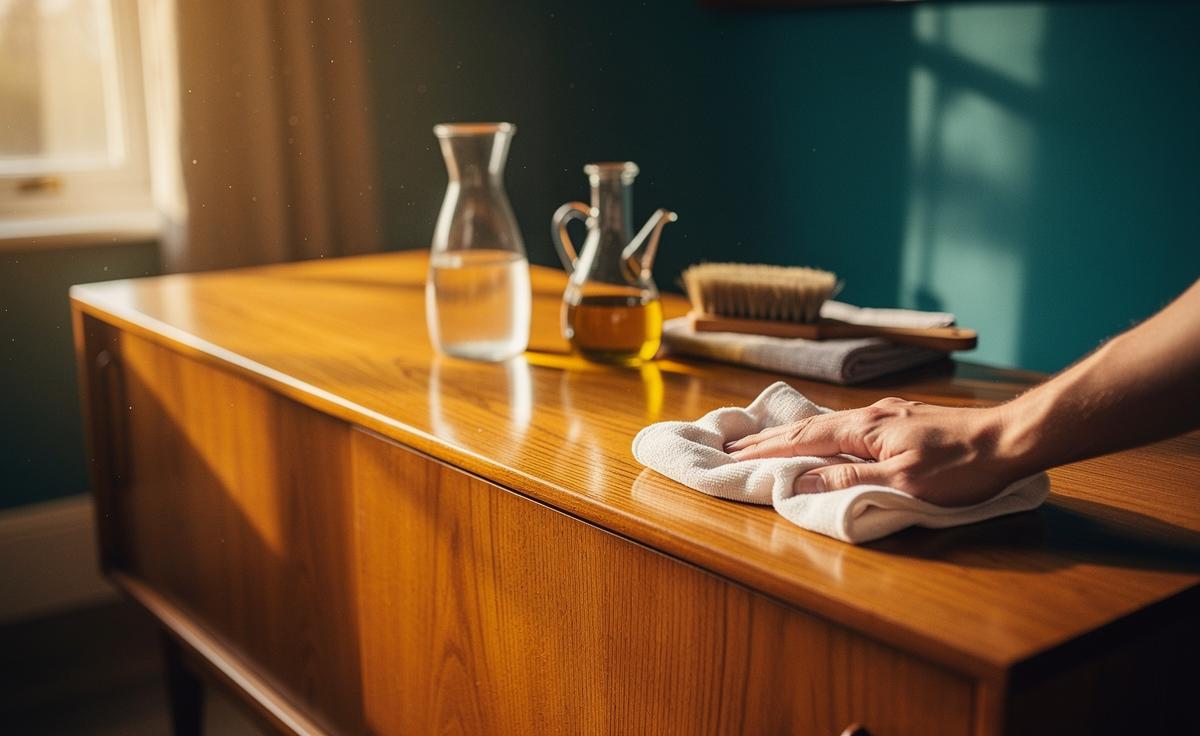
- ✨ Swap harsh chemicals for a pantry polish: mix 2 parts olive oil with 1 part white vinegar to fill micro‑scratches, lift grime, and restore an authentic satin sheen.
- 🧰 Apply with care: dust first, use a few drops on a soft cloth, work with the grain, wait 2–3 minutes, then buff thoroughly; never pour the mixture directly on the wood.
- ⚖️ Pros vs. Cons: Low-tox, affordable, reversible and patina-friendly, but can leave residue if overused and may smear on glossy lacquers or heavy wax finishes.
- 🧪 Finish fit matters: good for oil-finished pieces and surface-only on poly/varnish; avoid raw wood and always patch test on an inconspicuous spot.
- 🪑 Real-world result: a Bristol auction sideboard gained a satin glow and clearer grain with one light coat and diligent buffing—proof that less is more when reviving patina.
British households are quietly ditching aggressive aerosol polishes for a simpler ritual: a soft cloth, a little patience, and a pantry staple that coaxes the glow back into tired timber. The humble olive oil—sometimes paired with a dash of white vinegar—can lift dust, enrich grain, and lend furniture a lustre that feels hand-finished rather than factory-sealed. As a reporter who spends weekends trawling car boots and auction rooms, I’ve watched neglected oak and walnut come alive in minutes. Ban the harsh chemicals and your wood repays you with renewed vitality, plus a scent that whispers “kitchen,” not “chemistry lab.” Here’s the how, why, and when of a technique that respects both material and maker.
Why Olive Oil Revives Wood Grain
Wood looks dull when its surface is scored with micro-scratches and packed with grime that scatters light. Olive oil solves both problems at once: its triglycerides slip into fine abrasions, smoothing the optical landscape so grain appears deeper and richer. A scant splash of white vinegar cuts through finger grease and old wax haze, meaning the oil doesn’t just sit on dirt; it bonds with a clean surface. Used correctly, pantry oil enhances sheen without sealing the wood into a plasticky coat, preserving the tactile warmth that mass-market sprays can mute.
There’s a sensory element too: the gleam is not blinding but honest, closer to what cabinetmakers aim for when they burnish and buff. Unlike silicone-laced polishes that can complicate future refinishing, an oil-and-vinegar wipe is typically reversible with a mild soap and warm water. The caveat? Always spot-test on an inconspicuous area—finishes vary, and antique shellac or heavily waxed surfaces may require a gentler approach or a specialist’s eye.
- Key idea: Oil fills micro-scratches; vinegar lifts film, improving light reflectance.
- Good for: Dull, dry finishes that need conditioning rather than sealing.
- Not a cure-all: Won’t fix deep dents, broken veneer, or cracked lacquers.
How to Mix and Apply the Two-Ingredient Pantry Polish
A reliable starting mix is a simple emulsion: two parts olive oil to one part white vinegar. The vinegar’s mild acidity helps de-grime; the oil restores slip and depth. Shake in a small jar each time you use it—no need to store leftovers, as fresh is best and avoids any lingering odour. Less is more: over-application can leave a tacky surface that attracts dust, undermining the very clarity you’re trying to achieve.
Application is deliberately low-tech. Work on a clean surface, dusted with a slightly damp microfibre cloth. Apply a few drops of the mixture to a soft, lint-free rag and massage along the grain, not across it. After 2–3 minutes, buff thoroughly with a dry cloth until the piece feels dry to the touch. If you’re tackling intricate mouldings or chair spindles, a soft shoe brush helps distribute the polish evenly before the final buff. Never pour the mixture straight onto the furniture; control is everything, and drips can creep into joints.
- Mix: 2 parts olive oil, 1 part white vinegar; shake to emulsify.
- Test: Dab under a drawer or behind a leg first.
- Apply: Light, with the grain; wait a few minutes.
- Buff: Vigorously, clean cloth; repeat only if still dull.
- Finish: Stand back and assess under natural light.
Pros vs. Cons: When DIY Polish Shines—and When It Doesn’t
The pantry approach excels in contexts where a gentle, reversible refresh is the goal. Pros include affordability, immediacy, and a finish that respects patina rather than erasing it. For families wary of volatile organic compounds, the absence of harsh solvents is a meaningful win. It’s also a clever pre-sale spruce-up for charity shop rescues that need a quick lift before finding a new home.
But cons deserve equal billing. Olive oil can oxidise over time, and if you lay it on thick, dust will cling. Some modern high-gloss lacquers can smear under oil, and heavily waxed antiques may cloud. DIY polish isn’t a substitute for conservation—if veneer is lifting or the finish is alligatoring, seek professional advice. The rule of thumb: use oil-vinegar blends for maintenance gloss and light nourishment; for repairs, coatings, or deep clean-downs, look to specialist products and techniques.
- Pros: Low-tox, cheap, fast, reversible, enhances patina.
- Cons: Risk of residue if overused; not ideal for glossy lacquers; may unsettle heavy wax layers.
- Why shop-bought isn’t always better: Silicone sprays can complicate future refinishing, whereas simple oils are easier to remove.
Quick Reference: Finish Compatibility and Patch Testing
Understanding the underlying finish prevents surprises. On oil-finished furniture—think tung or linseed blends—the olive oil top-up behaves sympathetically, brightening grain. On polyurethane or heavy varnish, it won’t penetrate; you’re effectively dressing the surface, which is fine if you buff rigorously to avoid smears. Avoid raw, unfinished wood, where oil can darken unevenly and interfere with later finishing.
Always perform a patch test: apply a pea-sized dab behind a leg, wait ten minutes, and buff. If the area remains clear and non-tacky, proceed. If it smears, hazes, or darkens oddly, switch to a neutral cleaner or consult a restorer. Remember, you’re enhancing, not encasing—your goal is clarity, not a sealed coat.
| Finish Type | Compatibility | Notes |
|---|---|---|
| Oil-finished (tung/linseed blends) | Yes | Synergistic; buff well for a dry touch. |
| Waxed | With care | May cloud heavy wax; patch test and keep application minimal. |
| Shellac | With care | Gentle touch only; avoid flooding edges and joints. |
| Lacquer (nitrocellulose) | With care | Possible smearing; use very light coats and thorough buffing. |
| Polyurethane | Yes, surface-only | Will not penetrate; polish then buff dry to avoid residue. |
| Varnish (alkyd/urethane) | Yes, surface-only | As above; focus on cleaning and sheen, not saturation. |
| Unfinished/raw wood | No | Can blotch; use a purpose-made finish instead. |
Real-World Refresh: A Case from a Bristol Auction Find
Last month I followed a restorer in Bristol as he revived a late-1950s beech sideboard, sun-faded and freckled with mug rings. The plan wasn’t to refinish—a costly step—but to reveal what remained. After a gentle wash (warm water with a drop of mild soap), he mixed two teaspoons of olive oil with one of white vinegar and worked it in with slow, grain-long strokes. The top looked worryingly smeary at first; then the buffing began. In ten minutes the dullness gave way to a satin glow and the rings softened to whispers.
What struck me was restraint. No spraying, no acrid fumes, no attempt to fake “new.” Instead, a human-scaled polish that respected every knock and knot. He refused a second coat, opting to reassess in daylight the next morning. The buyer—who’d nearly walked away—saw figure he hadn’t noticed under the dust. That’s the point: the right pantry polish doesn’t overwrite history; it makes it legible. Result: a quick sale, a happier object, and no chemical hangover.
- Prep: Light clean, full dry, strong natural light.
- Polish: Minimal mix, meticulous buff.
- Outcome: Satin clarity, softened blemishes, authentic patina intact.
There’s dignity in furniture that shows its years—and practical grace in a maintenance routine you can repeat without donning a respirator. With olive oil and a measured hand, many pieces regain depth, colour, and a hand-rubbed gloss that flatters the grain rather than masking it. Keep applications light, buff until dry, and always test first; you’ll earn a glow that’s as much craft as chemistry. Which piece in your home is quietly asking for a gentle, pantry-powered revival—and what story might its newly revealed grain tell you?
Did you like it?4.6/5 (23)